Yes you heard it here first.... just before all the newspapers got this scoop... I have finished my chair!!! (round of applause please?) and if anyone would like to buy it... £600


(this photo does not do it justice!)
Now... I'm just trying to remember where I left off in the last post.... I know it was a long one as I hadn't updated for ages... so I must have covered a lot of ground! ah-ha.... Now I know, I had just finished the final stuffing and covered it with Calico! (wondrous fabric that I adore)
Well here is where all the stress started! I chose a beautiful fabric... it's very difficult to photograph and even more difficult to describe! But basically its a pale blue and gold pin stripe.. but in reality it takes on a green shimmer and looks different shades from different angles!
 It is amazing... and also a complete bi*ch to work with! Not only do you have to get the stripes to match up.. but you have to get them to be straight too.. and with this fabric being quite fine... all lumps, bumps, wiggles, anything that you would rather not be there gets exaggerated by 200%!!! great! (yes that is sarcasm) But I went ahead anyway as I knew this chair not only suited the fabric, but that it would look amazing covered with it!
The first stage of the final fabric is the seat... I covered this is polyester wadding, but I think in future I will be using the old method of cotton wadding between fine sheets of fabric/paper which is natural... (becoming a hippy in my old age...) once the wadding is cut to size the top fabric gets laid on... you have to find the middle of the chair and the middle of the fabric and line up the front and the back so the stripes are straight... plus when you start to tack down the fabric you have to work from the centre outwards... otherwise you pull the strips out of line! (as you can see this took quite some time)
Once all the tacks were in place, I spend quite a lot of time folding and tightening the front corners... this is because its an area which gets a lot of wear and its also in a very prominent place so it has to look just right! and you also have to selectively snip and pull around the arm join to get that all puled down with no wrinkles!
At this point I would like to apologise for not having photos... I'm afraid that I was so occupied with getting the chair just right I forgot to take any! - sorry
Then comes the back... this is done in the same manor, Polyester wadding then the top fabric worked from the centre out, and with the top corners these also have to be tight and very neat.. (turning a bit OCD at this point)
But the worst job of all.. the one that made me scream (and if any of you know me.. this takes quite a lot) was the arms! This chair is beautiful because of the proportions and also because it has scoop arms, which means curves in three directions at once!!!!

They took me forever! once you got the fabric tight and smooth in once direction there was a wrinkle in the other!! but, persistence played its role and I got them in the end....
It was at this point that I stood back and looked at what I had done and I was chuffed! then after talking to Jan, I realised I still had quite a bit to finish it off!!! (dam dam dam)

Jan said... "Your nearly there, you just need to do the outside! which means... hessian, wadding, and top fabric.. oh and don't forget the piping and the hand stitching!!"
so I set to work... first hessian

then polyester wadding (see pictures)
So once this was done on both sides and the back I had to get the top fabric ready.. So I pinned it on once side and started to do a ladder stitch up from the bottom right the way to the top back... it looked rubbish! because I havent ever done this stitch before it was very lumpy... so I decided to take it all off... (ahhhhhhh) and start again with piping!
So all three sides were pinned on and I drew a chalk line round where it was going to curve round the arms... then I pinned the back and the side together and made notches to show there the fabric joined up for when I sewed it together on the sewing machine...

I then had to make the piping.... its quite difficult to explain.. You get a wasted piece of the top fabric and start drawing (in chalk) diagonal lines... and this is where is gets complicated to explain... here is a drawing...
You have to sew this up into a tube and then cut down the lines.. and because you have off set the numbers (and subsequentlythe sewing) you end up with a long thin piece of fabric that you can use for piping!
You get the fabric and place some cord onto it and sew it so the fabric covers the cord, I had to make sure I had enough to go from one side of the chair to the other...
But once this was made.. things started to speed up....

I sewed the sides and the back together with all the piping in place (you have to really think about this because everything is back to front or inside out)

Once the machine sewing was all finished I attempted to put the top fabric on....
Firstly you want to get a good straight edge where you can.. so with the back you attach it on with cardboard and staples.... sounds funny but you have the fabric draped over the chair with the wrong side facing you and you attach it to the chair...
 you then flip the fabric over and tack it underneath... making a good straight edge...
 You then pin all the piping in place and start to sew it on with a ladder stitch - just like I did it before... but this time better!
I spent over two hours just sewing this on.. but when I stepped back and saw what I had done.. I knew it had bee the right decision.. the piping was "proper bo"!
I couldn’t believe how much of a difference it made!
Well... I then looked at the back seams to check they were tight to the frame.. but they werent.. but I wasnt scared of hand stitching any more and I started to pick them apart and sewing them up by hand... and this didnt take too long! I was quite surprised!
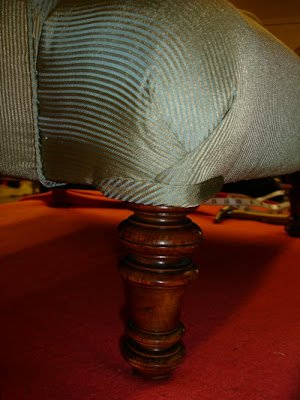
I then set to work on the final details... I put diagonal striping fabric round the front legs... and tacked all the excess fabric under the chair and added the black finishing cloth to cover all the springs and webbing (god that seams a long time I ago I did that)
Here is a selection of photos I took once it was done...


I am very proud of what I have achieved here... This is a fully traditionally upholstered Victorian Nursing chair... lovingly restored by my own fair hands!

Remember what it was like to begin with...?

And now check it out! oh yeah... it's been pimped!
COMING SOON..... CHAIS LONGE! woo hoo....
check out my life at www.flickr.com/photos/abstar

1 comment:
Fecking fantastic! Well done!
Post a Comment